Tuesday 12 November 2019

Mario Kart with Switches!

A year or so ago I wrote a blog sharing our family's excitement about the release of Mario Run and how my son was able to play Mario for the first time ever.  Last month saw another huge mobile release for any Nintendo fan: Mario Kart Tour, but for my youngest it isn't just any game...  It's the first Mario Kart game he's been able play himself.  

Macsen has a very rare genetic condition called GRIN2A which means he has profound disabilities meaning that he is unable to play games on a standard Nintendo console.  That hasn't stopped him falling in love with the Mushroom Kingdom, the Mario family and especially Mario Kart; he's cheered on his dad and brother as we raced in our family living room and at school his teachers play Mario Kart videos on the big screen during chill out times.  This game has been a big part of his life so you can imagine how excited Macsen was to finally play it himself.  Please take a look and hear the pure joy as Macsen plays Mario kart with his big buttons:


Mario Kart Tour is ideal for simplified disability access for lots of reasons:
- The karts auto accelerate, so there's no need to hold a button to keep driving forward
- There's a smart steering option, which works like bumpers in a bowling alley to stop new drivers spending all their time in the rough
- The auto item feature allows the driver to focus on moving left and right while the game activates the items for them
- The simplified controls of swipe left to move left and swipe right to move right is very easy to simulate using accessible switches

I've written a quick how-to below walking through setting up an iPad, which I hope will help families like ours.  Please let me know how you get on and hopefully we'll see your names popping up in our Mario Kart Tour races very soon!


How to

Here's a list of the items you'll need if you want to get it up and running:
- An iPad or Android tablet
- 2 or more switches - there's a big selection here: http://www.inclusive.co.uk/hardware/switches-and-switch-mountings
- A Switch interface to connect the switches to the tablet, we use: http://www.inclusive.co.uk/switch4apps-p5978

Once you've got your please follow these setup instructions:

1 - Connect the switch

Connect your switch to your switch connector, turn on Bluetooth and connect to the connector.  We use these switches and connector:
- Connector (APPlicator by Pretorian): http://www.inclusive.co.uk/switch4apps-p5978
 

2 - Register the Switches

You will need to follow these steps for each of your switches.  The ideal setup is 3 switches and we use:
- Port 1 - swipe left (move kart left)
- Port 2 - tap (use item) - this is optional as the game automatically uses an item when you pickup your next item block
- Port 4 - swipe right (move kart right)

To setup the switches goto settings and navigate to General > Accessibility > Switch Control


Tap switches and choose Add a new switch:


We have an external switch, so we choose External:
 

You are then prompted to activate the switch.  This basically means Push your button.
  

You wil be prompted for a button name.  I called mine Port [number] for simplicity 

Every switch must have a default action assigned.  Choose Tap (we'll override this later).
 

When setup your list will look something like this:


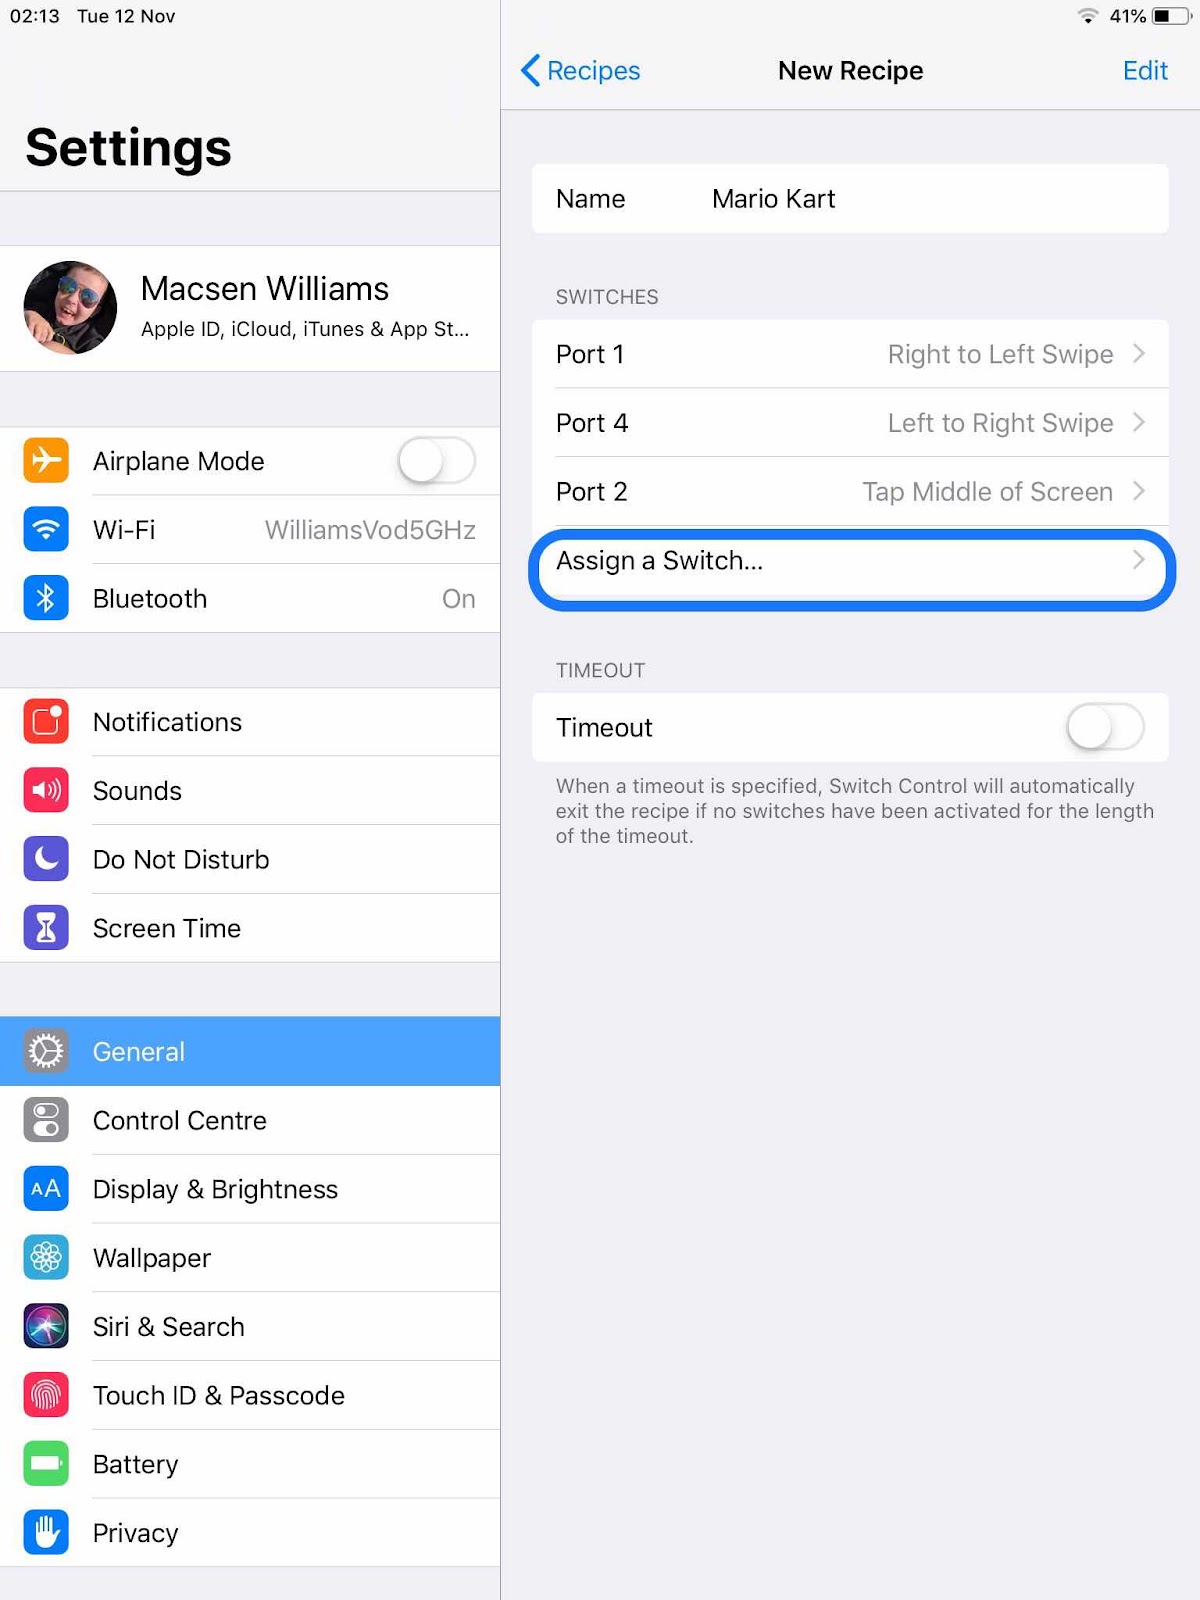
3 - Assign Mario Kart Actions

At this point the iPad is aware of the switch, but doesn't know what we want it to do with it.  We need to define a 'recipe' to tell the iPad to press the screen when the Switch is pressed.  You can setup different recipes for each game or activity.

Back at the Accessibility settings page choose Recipes and then new:
 

Given the recipe a name and assign each of your switches to the following actions:


The next step is very important, make sure you set the launch recipe to be the one you just created.  If you don't do this it won't be activated.


4 - Turn on Switch Control

The final step is to turn on Switch Control:
 

This is the same place to turn off switch control once you've finished the game.

If anything goes wrong with the setup just come back here and turn the switch control off and on again.

 
5 - Install and setup the game


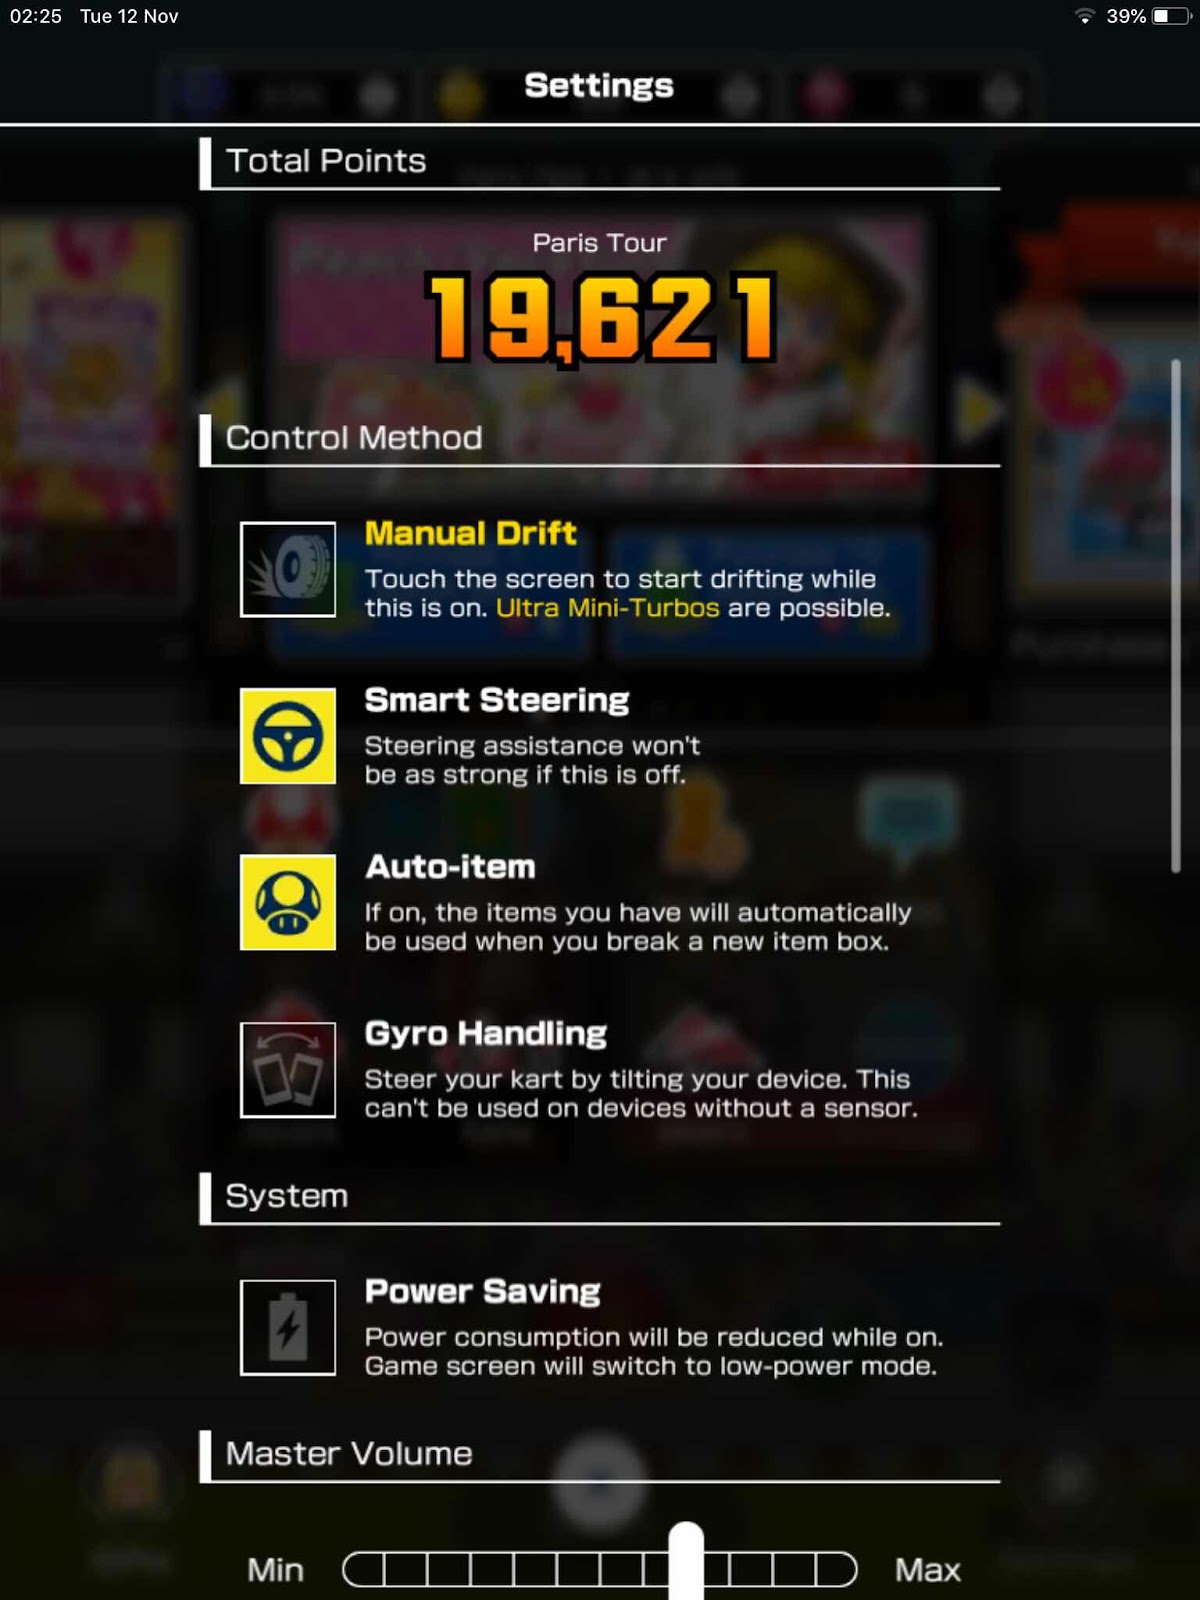
When the game is running open the settings and choose these options:
- Manual Drift off works best with switches and shows a nice direction arrow
- Smart Steering on will keep you on the track and works like bumpers at the bowling alley
- Auto Item on will use the items automatically, which is ideal if you are working with only 2 switches (our current setup)


6 - Race!

You'll need someone to navigate the menus and options who is able to use the touch screen, but once you're on the track you can use the switches to move left right and shoot!  Hopefully you'll come first in your first race just like Macsen!


Saturday 20 July 2019

Alexa Buttons - if you can't say: "Alexa"

"Alexa, ask Pikachu to talk"
"Alexa, sing a song"
"Alexa, open animal sounds"
"Alexa, beat box"
"Alexa, who lives in a pineapple?"
"Alexa, do a fart"
These are just some of the silly things that we ask Alexa on a daily basis.  I say we, but I really mean our eldest Ioan.  While he's messing with Alexa,  Macsen, our youngest son with a rare genetic condition, is hysterically laughing.  So when Macsen's birthday came along, finding a way for him to interact with Alexa was top of our list.

Turns out Amazon has already thought about this with their Echo Buttons:  https://www.amazon.co.uk/Amazon-Echo-Buttons-Alexa-Echo-Gadget-Alexa/dp/B072C4KCQH
echo buttons marketing image

These buttons are just like the Adaptive Switches that Macsen uses at school, but they're designed to work with Alexa via Bluetooth and can light up in any cololur combination.  The instructions for registering the buttons comes in the box and it's very simple to set up.  Once conmected you can create a new Routine from your Alexa phone app with lots of action types to choose from.  We set our buttons to either tell a joke or play a song:
one green Alexa button with the label "tell a joke" and a pink button with the label "play a song"Alexa routine settings to tell a joke

Here are some examples of the available actions that you can add to an Alexa Routine or button:

There are also a number of Alexa Skills and Games that already work with Alexa buttons.  Including:
  • "Alexa do a fart" will keep making different fart noises along with descriptions of the bodily functions every time you hit your echo button
  • "Alexa ask Pikachu to talk" will make slightly different Pikachu (Pokémon) sounds with each button press
  • "Alexa Yes No Buttons" will run an Alexa Skill that I've written, which helps children like Macsen to answer questions with yes and no responses.
Here's Macsen trying Yes No Buttons for the first time:


If you would like to use Yes No Buttons, please search the Alexa Skill store or follow this link:
https://skills-store.amazon.co.uk/deeplink/dp/B07TK9R1Z6

Please try Alexa Echo buttons and our Skill and let us know how you get on in the comments.

Tuesday 27 June 2017

Emergency Information (EmergencyID on iPhone)

At least once a week my wife and I meet with health specialist for our son.  Without even thinking we can reel off a list of his symptoms, conditions and complex medication.  He has a very rare genetic condition (GRIN2A) which causes every nerve in his body and brain to pass on messages incorrectly.  

As my son's condition is so unique his medication and treatment is very unconventional.  When we call ambulances we explain all of this, but what if something happened and I wasn't able to explain?  What if I was involved in an accident while caring for my son?  Who would tell the emergency services about my son?  How would they know how to look after him?


Firstly we worked with our NHS palative care specialists to create a PAC (Pediatric Advanced Care) Plan, which details his conditions, medications, treatment plans as well as recommended emergency approaches.  A copy of this plan is available to ambulance drivers and a copy goes with him everywhere he goes : 
Pediatric Advanced Care Plan 

I then setup an EmergencyID on my iPhone.  It's a little known feature, which allows the emergency services can see key medical information and can call your emergency contact without unlocking the phone.  It looks like this :

Lock screen - Emergency option bottom left  

lock screen - medical id option bottom left 
medical id screen 

From here you can see the most important information,  a pointer to my son's PAC plan and a button to phone my wife with a simple click.

Awesome isn't it?  This is how you can set it up :

1 - Open the Health app
iPhone health app icon  

2 - Select MedicalID from bottom right:
health app home page - medical id bottom right 

3 - Select 'Show When Locked' and complete the relevant fields
medical id edit screen 

4 - That's it, you're done!

Saturday 11 February 2017

Everyone can Mario Run

The Williams family is a Nintendo obsessed family.  Between us we've owned a Gameboy, SNES, Gameboy Advance, Nintendo 64, GameCube, Wii, Wii U, DS, 3DS, NES Mini and we have a Switch on preorder!  The male part of our family is made up of a geek dad and 2 geek boys aged 9 and 5.  They've watched all of complete back catalogue of Mario cartoons on Netflix, have a huge Amiibo collection and had lots of cool soft toys for Christmas. Unfortunately one of them has never ever actually played a Mario game; this is because my youngest has a severe disability that restricts his physical movement and control.  That is until today!  Today we played Super Mario Run: the first disability accessible Mario game.

Apple have included a lot of great accessible features into the iPhone and iPad iOS, which allows users to interact with a huge range of external devices.  The feature we used today was Switch Control.  We used it to connect a big button (known as a Switch) to Macsen's iPad to simulate a screen press.  There are a huge range of switches available including foot peddle, head switch (like Stephen Hawking uses), a hand grip switch, finger movement switch, a joystick and lots of others (here's a very Large selection: http://www.inclusive.co.uk/hardware/switches-and-switch-mountings).  We currently use a big easy press button yellow button with the excellent APPlicator connector from Pretorian http://www.inclusive.co.uk/switch4apps-p5978


Here's a video of Macsen's first game of Mario:


If you would like to have a similar setup, here's a how to guide :


How to

1 - Connect the switch

Connect your switch to your switch connector, turn on Bluetooth and connect to the connector.  We use this switch and connector:
- Connector (APPlicator by Pretorian): http://www.inclusive.co.uk/switch4apps-p5978
 

2 - Register the Switch

In settings navigate to General > Accessibility > Switch Control


Tap switches and choose Add a new switch:


We have an external switch, so we choose External (if you are bored later, you should try Camera.  It means you can control the game by tilting you head; it's very cool!) 
 

You are then prompted to activate the switch.  This basically means Push your button.
  

You wil be prompted for a button name.  I called mine Yellow port 4 (as it's a yellow switch in port 4 :) )

Every switch must have a default action assigned.  Choose Tap.
 

3 - Assign the switch with a screen press

At this point the iPad is aware of the switch, but doesn't know what we want it to do with it.  We need to define a 'recipe' to tell the iPad to press the screen when the Switch is pressed.

Back at the Accessibility settings page choose Recipes and then new:
 

Given the recipe a name and choose Assign a switch:
 

You should see the switch we registered earlier, select it:
 

When asked for an action choose Hold at Point.  This will tap a specific point on the screen and also allow you to perform long presses for bigger jumps, just the same as using the touch screen:
 

When you are asked to choose the point on the screen make sure you rotate the iPad to portrait orientation as this is the way you play Super Mario Run.

The best position I've found is Close to the bottom and in the centre, this works for jumping and choosing Retry of a Continue throughout the game:
 

The next step is very important, make sure you set the Lunch recipe to be the one you just created.  If you don't do this it won't be activated.
 

4 - Turn on Switch Control

The final step is to turn on Switch Control:
 

This is the same place to turn off switch control once you've finished the game.

If anything goes wrong with the setup just come back here and turn the switch control off and on again.  I've had problems when the screen locked, but this fixed it instantly,

 
5 - Play the game!

You'll need someone to navigate the menus and options who is able to use the touch screen, but once you're in the main gameplay you can use your button to jump, spin and smash goombas!
 

Saturday 6 August 2016

Virtual Reality for £3?

Oculus Rift from Google and Sony's Virtual Reality addon to PlayStation are both rumoured to be around £350 when available, so when my 8 year old came home with a £3 cardboard virtual reality goggles from Flying Tiger I wasn't expecting much. 


How wrong was I?  This thing is amazing!  Little did I know that there are already lots of free apps in the Apple App Store that work with it, just search for Virtual Reality!

It's based on Google Cardboard (https://store.google.com/product/google_cardboard) so there's lots of content from Google and others who have used their template.

When you're in a compatible app you need to tap this button to activate cardboard VR:

The image will split in two (1 picture for each eye).  For best results, you should hit the cog button and scan this QR code:

Then put your phone in this box:


And hold it up your eyes or use the elastic band (well it is £3) to secure it to your head:

Now wherever you look the image follows you!

Here's a sample from Google where you in a boat in a digital 3D ocean:

Where there's even a huge leaping, splashing whale:

What's most impressive feature of our £3 googles is the built in button which allows you to interact with the virtual world!


Already we've been looking around using Google Street View, played a load of games and looked around Rio to get a feel of the Olympic atmosphere.

All in all a bargain at £3!